Here’s how to order fire extinguisher cabinets from Larsens – a step by step guide.
- Select Model
- Choose Door Style
- Pick Door Options
| Meets ADA | Model | Trim Projection | Extinguisher Size | Wall Depth Required |
|---|---|---|---|---|
| Yes | 2409-R1 | 5/16” | 5 lb ABC | 5-1/4” |
| Yes | 2409-R2 | 5/16” | 10 lb ABC | 6-1/4” |
| Yes | 2409-R3 | 2-1/2” | 5 lb ABC | 3” |
| Yes | 2409-R4 | 3-1/2” | 10 lb ABC | 3” |
| Yes | 2409-5R | 1-1/2” | 5 lb ABC | 4” |
| Yes | 2409-6R | 2-1/2” | 10 lb ABC | 4” |
| Yes | 2409-R7 | 1-1/2″ | 10 lb ABC | 5″ |
| No | 2409-RA | 4” | 10 lb ABC | 2-1/2” |
| No | 2409-RM | 4-1/2” | 10 lb ABC | 2” |
| No | 2409-SM | N/A | 10 lb ABC | N/A |
Step One: Select Model
All models begin with ”2409”.
Only the suffix following “2409” changes – the suffix determines style of trim around cabinet.
All models use the same basic cabinet, only the trim changes.
The most critical factor is wall depth. You must know your wall depth first before selecting a model.
Next, check for models that hold the size of extinguisher required (5 or 10 lb). Lastly, look to see if the model meets ADA requirements.
Work from right to left using the chart above.
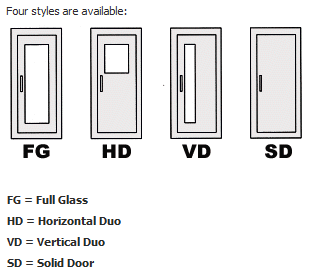
Step Two: Choose Door Style
Architects commonly specify the door style.
Step Three: Pick Door Options
Lettering: You may choose from no lettering, die cut lettering or decal lettering. Die cut makes for the nicest finished look but is slightly more expensive.
Glass: The standard glass panel is made from acrylic, but you may also select tempered glass or wire glass.
Lock: Cabinets come standard without locks but a lock may be added.
Yes, there are plenty of options. But at the end of the day there are only 3 basic steps:
- Select Model
- Choose Door Style
- Pick Door Options